Showing posts with label creative. Show all posts

February 11, 2013

Sharing the Love with Play-doh

Instead of giving lollipops and candy why not give these cute 2oz containers of play-doh to your child's classmates.  Children over 2 years will enjoy these cute colourful containers of play-doh, which will allow them to make whatever they want.  My daughter made small heart shapes and my son made a play-doh flower for me :)
I enjoyed playing with the play-doh as well, while showing  my kids how to make flowers with it.  
These containers of play-doh will keep children entertained for quite a while, and I am sure many parents and teachers will appreciate this :)
I like that the package comes with 15 containers and stickers for us to personalize and place on the container.  I used a marker to personalize it because pencils and regular pens didn't work well.  
These play-doh containers, along with the printable cards below would be awesome treats for our children's friends at school.
download Valentine's Day Cards
Sometimes we don't have the best way with words. This Valentine's Day help kids say something sweet to their friends with Wreck-It Ralph Valentine's Cards!  
Wreck-It Ralph will be available on HD Digital Feb 12 and on 3D Blu-ray Combo Pack on Mar 5
Printable Disney Valentine's card
Don't forget to enter the Disney on Ice Rockin' Ever After giveaway that ends on February 16th.  Open to everyone in Toronto (or anyone that can come to the show held at Rogers Centre during the March Break).
a Rafflecopter giveaway
All rights reserved on photographs and written content Createwithmom © 2011 - 2013. Please Ask First

January 17, 2013

Shaking up dinner with Cavendish potatoes and flash back of our PEI trip

Cavendish potatoes
Some days I have a hard time preparing a satisfying meal for dinner especially on busy days after work and school, so having something convenient to shake up our dinnertime is very helpful.

January 4, 2013

Instant makeover using StickerBrand Wall Decals

StickerBrand Wall Decal
The walls in our basement living room and entertaining area was bare and needed something to brighten it.  I couldn't think of a solution for it until I saw the wonderful designs of StickerBrand Wall Decals.
StickerBrand Wall Decal
Before
The gallery and ideas in their site helped me to pick this Swirl flower floral design, as I thought this design would be suitable for our area.  We can customize the StickerBrand measurements and colour to our preference.  I chose 38" tall x 125" wide design in black as our walls are painted white.

I found the ordering process simple and clear.  It was easy to navigate the site and choose, especially because there are pictures of how the design looks in an area.
StickerBrand Wall Decal
The vinyl wall decals are removable, but it cannot be re-positioned so plan before placing it.  We placed the decal with the backing sheet using tape to see how and where we want the design before peeling and sticking it.
StickerBrand Wall Decal
Even though the decal I chose is a big design, it was easy to work with as it came in workable small sections.  Each section was labeled so there was no confusion on how the design looks.  The decal also came with a sheet that suggested how to place the design, but we could paste it however we see fit.  I placed the design differently than the suggested way.

StickerBrand suggests that we wait for at least 2 weeks prior to placing the decal on freshly painted walls, as there may be invisible air pockets that may prevent the decals from sticking.
StickerBrand Wall Decal
  1. Before starting the project the walls must be dust free. To help the peeling process we kept the design with the peel facing down and rubbed the pattern using a credit card.  
  2. Then we placed the design on the space we wanted and slowly peeled it while making sure the design was sticking on our wooden panel walls.  
  3. We rubbed some small spots gently using our fingers so it pasted well.  We didn't need glue or other chemicals to place it.
StickerBrand Wall Decal
The variety of StickerBrand decals can be applied to most flat surfaces, slightly textured walls, windows, mirrors, tiles, bathroom walls or any smooth surface including our vehicles.  If a regular sticker sticks then StickerBrand products will stick.  The decals are supposed to work well on matt-finish or semi-gloss wall paint.
StickerBrand Wall Decal
After
StickerBrand adds new designs weekly and is sold online, so we can order from anywhere in the world.  After the wall decal was placed the whole area was instantly changed.  Now the space looks lively and the decals give it an artistic flair.  Family and friends that came over said how beautiful and bright the walls look.  I too like looking up at the wall and admiring it :) 

We can ask for our own image or design to be customized to a wall decal.  StickerBrand also has printed graphic decals and wall murals that can be removed and repositioned unlike the vinyl wall decal I have used. StickerBrand products are wonderful in any home or office, and it is easy to be placed by anyone.

Offer:
When we sign up for their Free VIP membership we get an instant 15% coupon that can be used within 30 days to purchase any of their 2500+ wall decals.    

All rights reserved on photographs and written content Createwithmom © 2011 - 2013. Please Ask First

December 24, 2012

Egg carton characters

To make this girl and boy with the baseball gear we needed...

1 egg carton
scissors
glue
markers
and things found around the home to decorate
* cloth
* plastic craft lace or gimp
* ribbon
* tissue paper
Children will need help from an adult to cut the cups from the egg carton.  Once it is cut just play with it and let your imagination take over in creating a variety of different things.
After creating this girl and boy with the baseball gear, we were able to make up our own little story behind it.
"Is she still looking at me?"
All rights reserved on photographs and written content Createwithmom © 2012. Please Ask First

December 14, 2012

A Science Kit that Entertains and Educates

This Science Kit from DK books has taught and entertained my children and I with many scientific facts.  There are over 100 experiments inside the kit that allows us to experiment with easy to find material from around our home.  The kit also includes some material that we need to start experiments. 
Although, this kit is intended for children over 8 years my 4 year old son liked joining his sister and me to do these experiments and to be part of it.  My daughter inferred her knowledge from school when we did some of the experiments.
This type of kits and books encourage children to start liking a subject such as science and makes it a part of their lives, rather than just "school subjects".  When parents get involved with teaching and making this type of learning fun from an early age, children will not think of it as a "chore" to learn subjects like science and geography.
This Science kit has action packed experiments that teach how everyday things work, so we can see and marvel at the mysteries of science.  We don't need to be a "science whiz" to do these experiments because the instructions are step-by-step.  I just wish the book has close up pictures on some instruction that need us to cut or do things more carefully; for example when we did the spinning helicopter it didn't exactly turn out the way it is supposed to because I didn't understand on how to cut the straw correctly, but we still had fun experimenting and trying to figure it out.  After all when experiments go wrong that too is science; that is what I told my children :)
When we did this experiment of inflating a balloon without blowing on it my children were involved and looked in awe at the result :)  I felt good trying to make connections and teaching them about carbon dioxide and how gas molecules take up more space than liquid molecules.  
You will need...
a balloon
glass bottle with a narrow neck
vinegar
baking soda
funnel

1. Pour vinegar into the bottle until it fills 1/4 of the bottle.
2. Fill baking soda into the neck of a balloon through a funnel until it is half full.
3. Stretch the balloon over the mouth of the balloon and leave it to hang.
4. When you are ready for action quickly lift the balloon so that the baking soda falls into the bottle.
5. Voila the balloon will inflate.
I asked my children to record the observations of the experiment in the book that came along with the kit.  My little one drew the picture while my elder one labeled and wrote what happened in the experiment.
I like that these types of kits encourage learning while children have fun.
Contest:
DK Canada books is having a holiday contest so we can win a DK shopping spree worth $250.  The contest ends on December 17th. 
All rights reserved on photographs and written content Createwithmom © 2012. Please Ask First

December 10, 2012

Photo Guide to Beading

I am always fascinated by the fabulous things we can do with beads and have bought lots of beads for no reason :)  When I buy the beads I am full of ideas on how I can use them, but never really end up using it because of time, short of materials and tools to finish the project.  

When I saw this fabulous Complete Photo Guide to Beading by Robin Atkins, I was excited to see the creative ideas on how I can use the beads that I have been collecting :)
This book is an ultimate reference to beadwork for novice and expert beaders.  The detailed instructions in the book are separated into three parts; stringing, weaving and embroidery.  There are about 28 projects with colourful clear pictures that teach beading techniques.  
Some beading work shown in the book include
  • stringing beads on elastic thread and wire to make beautiful jewelry
  • peyote stitch, brick stitch, net weaving and many different stitches
  • crochet and knitting with beads
  • stitching beads to fabric and embroidery
  • using beads in fringes, bezels and for edge stitches
  • explains about other tools and materials we need for the bead projects.
A little bit about beading and beads...
Beading has always been a human fascination and used for adornments.  Beads are and have been a part of every culture and land.  They were once used for barter and trade because of their portability and durability.  The value of the bead was based on age, uniqueness and material.

The author explains the variety of beads in detail and on how to care for them.  To test if beads will fade leave it under direct sunlight, and test it by washing with water and detergent to see if the colour stays the same compared to the original.  
Don't leave pearls in plastic bags, as it will release chemicals causing pearls to loose their luster.  To store the pearls leave it in a soft cloth bag or glass jar.
I would recommend this book if you are into beads or want to learn the skills.  This book is available in bookstores and amazon.  

All rights reserved on photographs and written content Createwithmom © 2012. Please Ask First

December 9, 2012

Gingerbread cookies and Celebrating the Joy of December

In the month of December more than any other month through the year, I feel that my family and I tend to be in a celebrating mood :)  The lights, snow, family gatherings, the relaxing feel, cozying up, baking, giving, getting gifts, making new plans, our son's birthday are some of the things in December that we look forward to.  

To keep our children occupied and to make the holiday season memorable we make holiday crafts, bake cookies and go for a drive just to see winter lights covered in blankets of snow.  We made these holiday Gingerbread cookies adapted from Joy of Baking site.  My children helped me bake and decorate, if you would like to make a batch with your little ones you will need...
3 cups flour
3/4 tsp baking soda
1/2 tsp salt
2 tsp ground ginger
1 tsp ground cinnamon
1/4 tsp ground cloves
1/4 tsp ground nutmeg
1/2 cup unsalted butter at room temperature
1/2 cup sugar
1 egg at room temperature
2/3 cups molasses

We can use a paddle attachment in the stand mixer or hand mixer to make the dough.
Beat butter till it is creamy, add sugar and beat till the mixture is light and fluffy.  
Add the egg and beat.  
Spray the container with oil spray before measuring molasses so it doesn't stick to the measuring cup.  Then add the molasses to the mixture and combine.
Add the sifted dry ingredient 1/3rd at a time to the wet mixture.  After adding and mixing all the flour, gather the dough into a ball and cut it into two parts before covering it with a plastic wrap.  Leave the dough in the fridge to chill overnight or until it is firm so it can be easily rolled.
Flour the surface, rolling pin, cookie cutters and hands well with flour and roll the dough about 1/2" thick.  Keep turning and lifting the dough so it doesn't stick.
Prepare a tray with parchment paper and butter before placing the cut shapes.  Space about 1"between the cookies and leave the tray in the fridge for about 10 minutes before baking.  Bake in a preheated 350F oven for 8 to 10 minutes.  The cookies should barely brown around edges if baked too much it will become too crispy.  Cool completely on a wire rack before decorating.
The cookies will stay well covered for up to two weeks if it lasts that long :)
For more holiday cookie and baking ideas check LMD Facebook page as Pillsbury will be sharing their ideas from December 3rd to the 15th and Betty Crocker will be sharing their ideas from December 17th to the 31st.
Disclosure:  I am participating in the Life Made Delicious Ambassador program and receive special perks as part of my affiliation.  All rights reserved on photographs and opinion of the written content Createwithmom © 2012.  Please Ask First

December 6, 2012

StickyGrams will stick well with many people

stickygrams magnet
StickyGrams are personalized magnets that are made with pictures from Instagram that cherish our memories throughout the year.  It is easy to place and replace these to any magnetic surface without damaging the surface it is placed on.  We can also hang them in other creative ways on non-magnetic surfaces. 

I found it easy to use their site and create these magnets by following 3 simple steps that are prompted to us.  
stickygrams magnet
3 simple steps to order
The cost for a sheet with 9 pictures is $14.99.  I think these StickyGrams make a wonderful memorable gift to anyone any age.  

If you want to get your pictures to give as gifts for the holidays order it soon.  For USA and everywhere else in the world order before December 9th so you will have it by 25th of December and for UK and EU before the 13th of December.
stickygrams magnet
The back of the StickyGram
All rights reserved on photographs and written content Createwithmom © 2012. Please Ask First

December 2, 2012

Play-doh Buster Digging Riggs Power Crane

Buster power crane from Tonka, Chuck & Friends is a fun toy that children will easily spend hours playing.  My son enjoys playing this Digging Riggs Power Crane with his sister.  
They like building and creating a wide variety of construction type models using the colourful 12 oz play-doh that comes in black, grey, brown and red.  The colours resemble the things that we see in the construction zones.  
This power crane has 10 tools such as the drill bit, roller, moulds, wrecking ball, stamps that fit into the crane.  My children use the tools to make blocks, tolls, mud, polls etc.  They also used the tires on the crane to make prints.
Children can make a variety of models with this toy depending on their age and skills.  This toy includes 2 AA batteries for light and sounds.  This toy is intended for children over 3 years.
Children will be able to show their creative skills and practice their fine motor skills with this toy.  These type of toys help children to identify and relate to things they see in real life such as in the construction zone.
All rights reserved on photographs and written content Createwithmom © 2012. Please Ask First

November 28, 2012

Learning to take the Perfect Picture

It is always nice to learn from someone on how to operate the camera instead of reading the manual and books :)  I too have tried asking family/friends, reading the manual and going through many many photography books, which didn't work well for me.  

November 25, 2012

Our kitchen renovation DIY project using Aspect metal

kitchen renovation
We renovated our kitchen and changed how our kitchen looks using Aspect Metal peel and stick tiles. This DIY project was very exciting as it changed the whole look of our kitchen giving it a sleek, sophisticated, modern and a clean feel that we really like. My husband did all the work on his own and completed the project within a couple of days during the weekend. The project would have been completed sooner, however because of time limitations he did the project a little bit at a time.  
aspect tiles kitchen renovation
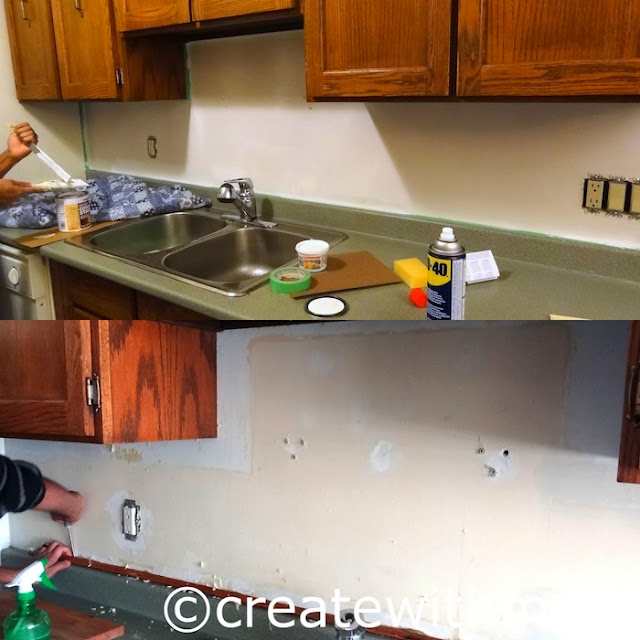
We had wallpaper prior to doing this project and had a few prep work to do. He removed the wallpaper, cleaned it up, fixed up the wall, primed it with an oil based primer and left it to completely dry before starting to paste the tiles. The instruction that came with the tiles said that it would work well only on flat, primed, smooth walls so we wanted to make sure the wall was perfectly ready :) We read the instructions very carefully twice before starting and I highly recommend this. The video on this site is also very helpful to watch before starting the project.  
aspect tiles kitchen renovation
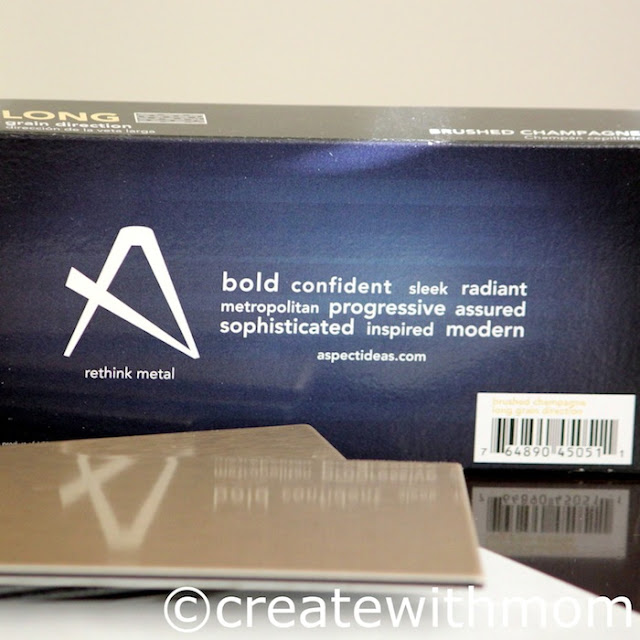
The instructions on the tile box has a list of tools we may need.  
We used...
hacksaw for the large pieces
chisel for small pieces
sandpaper to smoothen the sharp cuts
utility knife
pencil, paper, cloth, primer, brush
adhesive glue
drill (only needed if want to put any shelves or screws for hanging purposes)


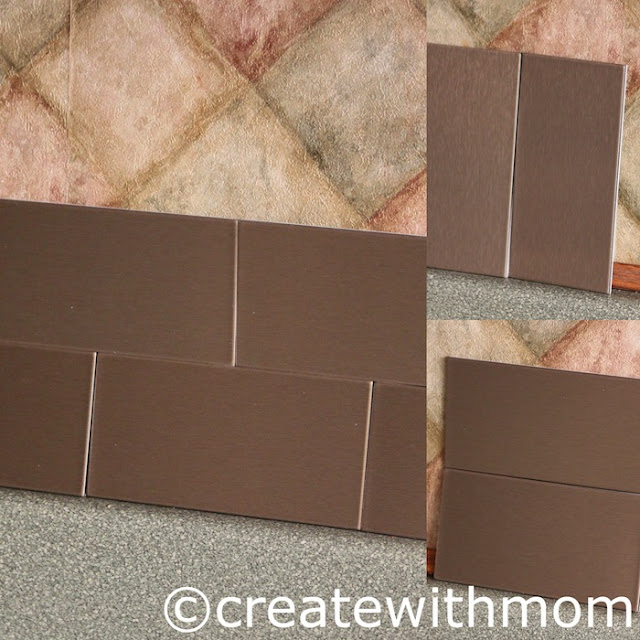
Before sticking the tiles we measured, then measured again and decided that the subway pattern was most suitable for us.  There were lots of design ideas online as well as on the instruction sheet, which was helpful.  

aspect tiles kitchen renovation
My husband drew the middle line before pasting the tiles starting from the centre and out.  He also did the bottom row close to the counter to make sure the tiles will be aligned correctly.
We chose the long grain, brushed champagne tiles.  Each box has 8 tiles that are 3"x6", and to cover our area we needed 12 boxes.
aspect tiles kitchen renovation
When doing this projects we encourage and recommend that...
  • You measure everything twice :)
  • When cutting think about the grain because if the grains are not in the same direction it will look different depending on the lighting and angle; unless you want the different shades as part of your decor
  • Use glue adhesive to stick the tiles it is better in the long run
  • Remove the film on the front just before placing so the tiles don't get any scratches
  • Throw away the front and back peel immediately to avoid slipping on these
  • Start from the centre so the pattern will flow and look good
  • We wanted to put a shelf so we had to make holes into the tiles so we drew the location of the holes first on a piece of paper then made the points on the tile and carefully drilled it
  • After cutting don't skip on sanding the edges
  • We can use a clear or coloured caulk to seal around the bottom and edges 
  • Get matching switch plates, this is something we forgot and had to hurry to Home Depot :) and found decor wall plates from Atron.  The Aspect tiles site recommends outlet covers from Wall Plate Warehouse.
aspect tiles kitchen renovation
There are lots of pros in using these Aspect Metal tiles:
  • The look is fabulous and gives the space a contemparary feel.
  • Instantly adds a whole new beautiful look, which also adds value to the space.
  • A modern look with the metal for an affordable price and a fraction of the cost compared to using real tiles.
  • We can do it ourself and not have to pay contractors and experts.
  • Easy to maintain and clean by simply wiping it with a soft cloth.
  • The tiles are eco-friendly as it made with 50% recycled materials and the tiles are 100% recyclable 
  • There is a good choice of colour we can choose from; brushed champagne, stainless, copper and bronze.
  • There are two types of grains we can choose from long or short grain. 
  • Once the project is complete we will feel really good :)
aspect tiles kitchen renovation
My husband really enjoyed the whole process and he says he liked how he felt when every tile was placed :) which is good news for me as I can think of other projects to do.  My children and family/friends who came said how good it looks.  My four year old suggests that we decorate the entire living room with these tiles :)

These tiles are available online and at home hardware stores such as Home Depot.  Aspect metal tiles will look good as backsplash, in small areas of the wall to add accent, in cabinets and to put detail around fireplace etc.  We really enjoyed the process of doing this project and are enjoying how good the kitchen looks now.  If you are thinking of doing something to spice up your kitchen or other areas around the home think metal and choose these tiles from Aspect ideas.
kitchen renovation
All rights reserved on photographs and written content Createwithmom © 2012. Please Ask First


Updated September 3, 2015 In Reply to a question from a reader (Thank you Stacey):
Was curious how they have held up. More info about the additional glue you used would also be interesting. Did you take the foam backer off first?

Answer 
The Aspect tiles are holding up great since we placed them in 2012. We did a kitchen renovation (Cabinet transformation) and decided to keep the aspect tiles because it still looks new. We did not remove the foam backing as it is not supposed to be removed just the peel from the sticker was removed before each tile was pasted. There is a film protecting the tiles which was removed after the tiles were installed. The glue that was on the peel off wasn't as strong (the items in 2012), so I used the "Weldbond" universal adhesive that can be found at Homedepot or Lowes, you could use any construction adhesive. I primed the wall before installation so the tiles stuck firm.
Also another tip, if you need to cut the tile its best to use a utility knife and keep scoring it and then snap off.

November 18, 2012

Duct tape activities and Tape it & Make it book giveaways

Making creative things using duct tape is a fun hobby for all ages.  My daughter likes using duct tape to do activities and she made this hair tie and gave it as a gift for my birthday.
Duct tape has been around since the 1940s and was originally used as an adhesive for ammunition cases during World War II because of it water resistant qualities.  The military used it for quick fixes on jeeps etc.  Eventually duct tape became available in hardware stores where plumbers and builders gave its current name "Duct tape".  
Now craft stores have a variety of colourful duct tape.    
I made this decorative bow following the instructions from Tape it & Make it book by Richela Fabian Morgan.  This bow would be wonderful handmade touch to put on gifts or to decorate the home/class etc.
This book has over 100 creative project ideas...
  • Duct Tape Accessories- wallets, sandals, watch strap and more
  • Duct Tape Clothing- apron, necktie, mini skirt, tool belt, and more
  • Duct Tape Flowers- roses, iris, water lilies, and more
  • Duct Tape Animals- turtle, duck, lion's head, puppy, and more
  • Megativities- skyscraper, Rubik's Cube, and more
When doing activities with duct tape...
  • First clean a formica or melamine table top with a damp cloth to remove dust before starting to work.  
  • Clean the craft knife or scissors right after the project is finished, use a little bit of mineral oil or petroleum jelly to clean easily.  
  • Keep the tapes dust-free in a transparent bin so you can see the different coloured tape without opening/closing the box.
This book is available in bookstores and Amazon.  We can follow the author on Facebook to see more creative activities.
Giveaway
2 people in Canada can win this book Tape it & Make it book by entering through the rafflecopter below.  This giveaway ends on Dec 1st.
a Rafflecopter giveaway
All rights reserved on photographs and written content Createwithmom © 2012. Please Ask First