

The layout of the washroom before we renovated wasn't functional, and made the bathroom look small and hard to maintain. When we did the remodel, we decided to change a few things in the space to make it feel spacious. For example, the door to the bathroom now opens outward giving more space inside.


 For the shower stall floor and the custom seating inside the shower stall we chose hexagonal tiles with the honeycomb composition. We felt that this design adds more character when it is spread across the floor and up the wall of the shower stall seat.
 The 2" tiles we chose have texture on it, similar to the shower stall flooring we chose in another bathroom in our home. We like the texture on this tile because it looks fun, and mainly because the stone feel and grip that does not slip easily. I am glad we added the custom shower bench, as it is useful to take a seat while in the shower.


We decided to bring the closet inside the bathroom. This closet was in the hallway adjacent to the bathroom and was not accessible from the inside. Bringing the closet inside, has become more convenient to get towels and personal care items.

We added a DIY rolling door to the closet so it can maintain privacy. To keep everything inside the shelves organized we added rev-a-shelf storage options. Adding rev-a-shelf pullout options helps to easily access the items for everyone, so we can better use the deep shelves without difficulty.


For the accessories, shower fixtures, and the faucet we placed on our DIY custom built vanity, we chose the Delta Dryden collection in Venetian Brown that contrasts with the colours we chose for the bathroom, and adds character. Placing these accessories such as the toilet paper holder, robe hook, and towel holders makes the space convenient and functional.

We decided to place a long rectangle mirror over our DIY vanity and toilet that makes the room appear big. We found adding the large mirror makes it functional and helps bounce light around the washroom.
For the light fixtures we wanted to maintain simplicity, but wanted a lot of light, and the option of dimming the light to have a spa feel. We added flush mounted LED ceiling fixtures with a dimmer option, and a waterproof flush mounted LED ceiling light for inside the shower stall. We also added a exhaust fan that helps prevent moisture from gathering, and helps the bathroom have good ventilation.
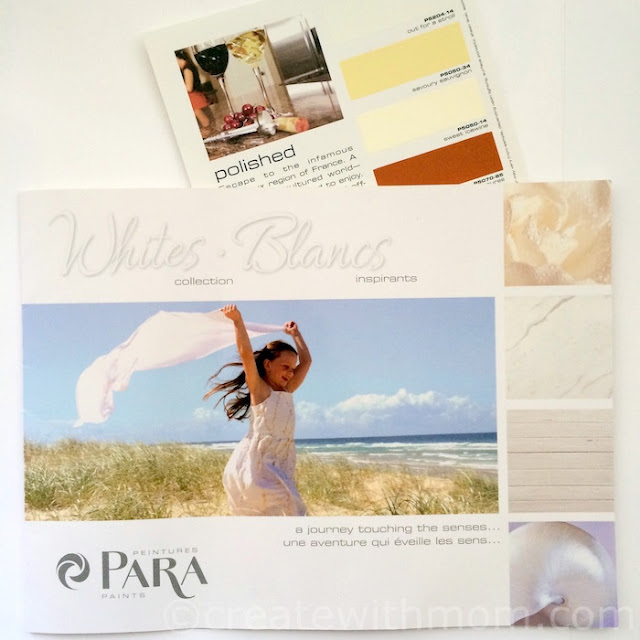 For paint we went with Para paints, and used their Ultra collection. We chose the white tones, so the accessories have a bold contrast, and the room feels bigger. Since all the drywall was new we primed it first with Ultra Latex Primer, then painted the trims, the closet door, and the washroom door with Chrysler Hall white. For the walls and ceiling we used a glossier finish mold and mildew free Kitchen and Bath, Out for a stroll white paint. For the hallways where we closed up the closet, we used their Sweet Icewine, a cream tone paint.
Hope this post inspires you to take on a #BathroomReno.
For the light fixtures we wanted to maintain simplicity, but wanted a lot of light, and the option of dimming the light to have a spa feel. We added flush mounted LED ceiling fixtures with a dimmer option, and a waterproof flush mounted LED ceiling light for inside the shower stall. We also added a exhaust fan that helps prevent moisture from gathering, and helps the bathroom have good ventilation.

Hope this post inspires you to take on a #BathroomReno.
All rights reserved on photographs and written content Createwithmom © 2010 - 2016. Please Ask First
beautiful renovations! love the shower stall!
ReplyDeleteThis looks great!
ReplyDeleteI too would do tthat with the shower, making an insert for shampoos etc!!! you must have two bathrooms though LOL, because I can't imagine doing renos when you only have one (like us) ...so amazing!! thanks for sharing, it does imspire I tell you
ReplyDeleteWow! I need to renovate mine, but we only have 1 bath and shower bathroom. So the tub would need to be done quick.
ReplyDeleteGreat Renovations! Your shower stall is just like the one I want in my dream home!
ReplyDeletegorgeous. I wish I had the money to do a total reno on my bathroom. I might spruce it up with new paint and new shower curtain
ReplyDeleteThat is an amazing reno!! looks beautiful, I love the sliding doors for the closet space that is one of my favourite parts of the reno!!!
ReplyDeleteHow beautiful! I have enjoyed watching this reno unfold.
ReplyDeleteThat's quite the transformation.....well done!
ReplyDeleteJust the washroom layout I was looking for. Thanks for sharing.
ReplyDeleteNice grey you chose. So nice to have it done I bet.
ReplyDeletejan
I absolutely love the cozy feel! What a beautiful job done and a fantastic utilization of the space!! Stunning, love it!
ReplyDeleteBeautiful renovations love the shower stall and your flooring choice is perfect.
ReplyDeleteWhat an amazing job on the renovation! It looks beautiful!
ReplyDeleteamazing renos, my bathroom really needs one
ReplyDeleteOmg such a transformation 😍 Black and White my favorite style for bathroom great job 👍
ReplyDelete