

After transforming the cabinets with Rust-Oleum
We have used Rust-Oleum about three years ago to transform our front porch, and love the results. Due to our trust in their products my husband and I undertook a DIY project during the holidays using the Rust-Oleum Cabinet Transformation kit. Using this kit to transform the kitchen cupboards to our preferred colour is less costly compared to changing the entire cupboards or doing messy demolitions. 

Before picture of the kitchen
I feel using Rust-Oleum is an eco-friendly option than replacing good condition kitchen cupboards. We found using the Rust-Oleum Cabinet Transformation kit to be hassle-free compared to using a variety of different products to get the results. The kit comes with everything we need except paintbrushes, so there is no need to research and look at other options. 

The end results of getting that brand new look for our existing cupboards felt rewarding and satisfying, although we did have to deal with a bit of a mess in our home for about five days.
 First, we removed all our content from the cupboards and removed some old wallpaper and cupboard liners that were there. Although using this kit eliminates the need to sand the cupboards, we decided to lightly sand the cupboards and wiped them with a cloth.
 Then my husband did the first step of applying the deglosser to remove grease, oil and dirt from the cabinets. The smell of the deglosser is strong when we apply it, but it doesn't linger for a long time.
 After this step, the next day we applied the tinted bond coat. We coated the outer parts of the cupboards a couple of times. Once it dried we put on the protective topcoat. Using a synthetic paintbrush will not show any brush strokes. We chose not to glaze our cupboards, as we wanted the cabinets to have a modern look.


We used the light kit and tinted the bond coat to Quilter's White. They also have a dark kit, if you plan to paint your cupboards in darker shades. I like that for most parts of this project there was no odour, and it was easy to clean up the accidental spills since the coats are water based.
 We found the DVD that came with the kit to be helpful, I recommend anyone who wants to use the kit and do the project to watch the DVD a couple of times before starting. We have no complains using this kit to transform our cabinets, and I like that Rust-Oleum backs our satisfaction 100%.

 We removed all the screws from the hinges, labeled everything and spray painted the hinges, and let it completely dry before using them to put the cabinets back.
 If you are looking to use this kit, it is available in light and dark tints for $100 a kit at Home Hardware stores. The kit covers up to 100 sq. feet with 2 exterior coats and 2 coats on the interior of each door and drawer face.
We are still working on our kitchen renovation, and need to finish up things like painting, replacing the countertops and faucet, and organizing. Follow my #KitchenReno to see our tips, and what we used.


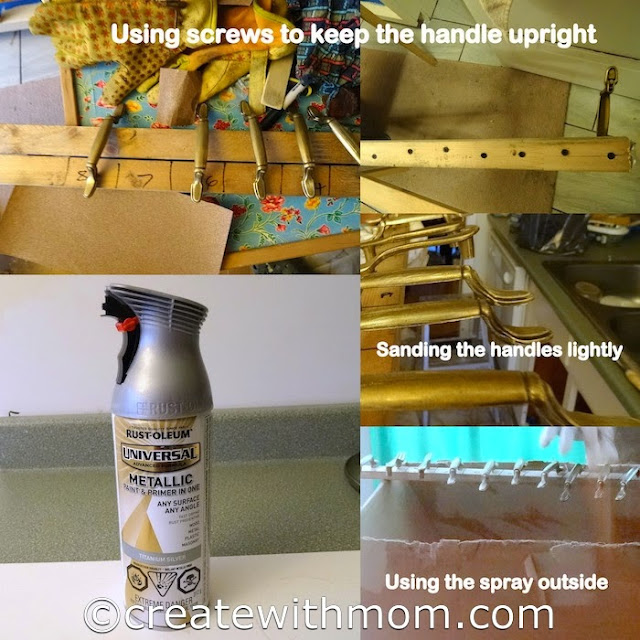
For the handles and hinges we spray painted it using the Rust-Oleum universal metallic paint. First, we washed and used a light sandpaper to get the handles ready to spray paint. My husband used screws and placed all the handles on a piece of wood and sprayed it outside and left it to completely dry.

When we tried to put back the sprayed and dried handles on the cabinet doors, we used a carpet to keep the cabinet doors off the tiles. When we were pressing the handles onto the carpet it gave the handles a texture. Since we liked this unique touch on the handles we did this to all the handles.


We are still working on our kitchen renovation, and need to finish up things like painting, replacing the countertops and faucet, and organizing. Follow my #KitchenReno to see our tips, and what we used.
All rights reserved on photographs and written content Createwithmom © 2011 - 2015. Please Ask First
I love the results it looks amazing, where is this kit available at and is it expensive? my cupboards when I bought the place looked fine but it ends up they were a dark color originally and they used just a regular wall paint on them and I can see the dark showing through in spots,
ReplyDeleteThank you :) I updated the post with that information :) We used this kit to change our dark cabinets to light and we don't even remember what colour it was before when we look at the cabinets
DeleteIf you are looking to use this kit, it is available in light and dark tints for $100 a kit at Home Hardware stores. The kit covers up to 100 sq. feet with 2 exterior coats and 2 coats on the interior of each door and drawer face.
Wow! what a transformation, your cabinets look awesome and I liked that you left the texture of the carpet on the handles, a great mistake that turned out wonderful!! we need to do our kitchen, but hubby and I cannot agree on paint colours..lol
ReplyDeleteOMG that's wonderful!
ReplyDeleteGood job
My relatives always say that I am killing my time here at net, but I know I am getting familiarity all the time by reading thes good articles.
ReplyDelete