

Showing posts with label diy. Show all posts
Showing posts with label diy. Show all posts
October 29, 2013
Planning Our #BathroomReno DIY Project
January 4, 2013
Instant makeover using StickerBrand Wall Decals

The walls in our basement living room and entertaining area was bare and needed something to brighten it. I couldn't think of a solution for it until I saw the wonderful designs of StickerBrand Wall Decals.
 |
| Before |
The gallery and ideas in their site helped me to pick this Swirl flower floral design, as I thought this design would be suitable for our area. We can customize the StickerBrand measurements and colour to our preference. I chose 38" tall x 125" wide design in black as our walls are painted white.
I found the ordering process simple and clear. It was easy to navigate the site and choose, especially because there are pictures of how the design looks in an area.

The vinyl wall decals are removable, but it cannot be re-positioned so plan before placing it. We placed the decal with the backing sheet using tape to see how and where we want the design before peeling and sticking it.

Even though the decal I chose is a big design, it was easy to work with as it came in workable small sections. Each section was labeled so there was no confusion on how the design looks. The decal also came with a sheet that suggested how to place the design, but we could paste it however we see fit. I placed the design differently than the suggested way.
StickerBrand suggests that we wait for at least 2 weeks prior to placing the decal on freshly painted walls, as there may be invisible air pockets that may prevent the decals from sticking.

- Before starting the project the walls must be dust free. To help the peeling process we kept the design with the peel facing down and rubbed the pattern using a credit card.
- Then we placed the design on the space we wanted and slowly peeled it while making sure the design was sticking on our wooden panel walls.
- We rubbed some small spots gently using our fingers so it pasted well. We didn't need glue or other chemicals to place it.

The variety of StickerBrand decals can be applied to most flat surfaces, slightly textured walls, windows, mirrors, tiles, bathroom walls or any smooth surface including our vehicles. If a regular sticker sticks then StickerBrand products will stick. The decals are supposed to work well on matt-finish or semi-gloss wall paint.
 |
| After |
StickerBrand adds new designs weekly and is sold online, so we can order from anywhere in the world. After the wall decal was placed the whole area was instantly changed. Now the space looks lively and the decals give it an artistic flair. Family and friends that came over said how beautiful and bright the walls look. I too like looking up at the wall and admiring it :)
We can ask for our own image or design to be customized to a wall decal. StickerBrand also has printed graphic decals and wall murals that can be removed and repositioned unlike the vinyl wall decal I have used. StickerBrand products are wonderful in any home or office, and it is easy to be placed by anyone.
Offer:
When we sign up for their Free VIP membership we get an instant 15% coupon that can be used within 30 days to purchase any of their 2500+ wall decals.
All rights reserved on photographs and written content Createwithmom © 2011 - 2013. Please Ask First
November 25, 2012
Our kitchen renovation DIY project using Aspect metal

We renovated our kitchen and changed how our kitchen looks using Aspect Metal peel and stick tiles. This DIY project was very exciting as it changed the whole look of our kitchen giving it a sleek, sophisticated, modern and a clean feel that we really like. My husband did all the work on his own and completed the project within a couple of days during the weekend. The project would have been completed sooner, however because of time limitations he did the project a little bit at a time.

We had wallpaper prior to doing this project and had a few prep work to do. He removed the wallpaper, cleaned it up, fixed up the wall, primed it with an oil based primer and left it to completely dry before starting to paste the tiles. The instruction that came with the tiles said that it would work well only on flat, primed, smooth walls so we wanted to make sure the wall was perfectly ready :) We read the instructions very carefully twice before starting and I highly recommend this. The video on this site is also very helpful to watch before starting the project.

The instructions on the tile box has a list of tools we may need.
We used...
hacksaw for the large pieces
chisel for small pieces
sandpaper to smoothen the sharp cuts
utility knife
pencil, paper, cloth, primer, brush
adhesive glue
drill (only needed if want to put any shelves or screws for hanging purposes)
Before sticking the tiles we measured, then measured again and decided that the subway pattern was most suitable for us. There were lots of design ideas online as well as on the instruction sheet, which was helpful.

My husband drew the middle line before pasting the tiles starting from the centre and out. He also did the bottom row close to the counter to make sure the tiles will be aligned correctly.
We chose the long grain, brushed champagne tiles. Each box has 8 tiles that are 3"x6", and to cover our area we needed 12 boxes.

When doing this projects we encourage and recommend that...
- You measure everything twice :)
- When cutting think about the grain because if the grains are not in the same direction it will look different depending on the lighting and angle; unless you want the different shades as part of your decor
- Use glue adhesive to stick the tiles it is better in the long run
- Remove the film on the front just before placing so the tiles don't get any scratches
- Throw away the front and back peel immediately to avoid slipping on these
- Start from the centre so the pattern will flow and look good
- We wanted to put a shelf so we had to make holes into the tiles so we drew the location of the holes first on a piece of paper then made the points on the tile and carefully drilled it
- After cutting don't skip on sanding the edges
- We can use a clear or coloured caulk to seal around the bottom and edges
- Get matching switch plates, this is something we forgot and had to hurry to Home Depot :) and found decor wall plates from Atron. The Aspect tiles site recommends outlet covers from Wall Plate Warehouse.

There are lots of pros in using these Aspect Metal tiles:
- The look is fabulous and gives the space a contemparary feel.
- Instantly adds a whole new beautiful look, which also adds value to the space.
- A modern look with the metal for an affordable price and a fraction of the cost compared to using real tiles.
- We can do it ourself and not have to pay contractors and experts.
- Easy to maintain and clean by simply wiping it with a soft cloth.
- The tiles are eco-friendly as it made with 50% recycled materials and the tiles are 100% recyclable
- There is a good choice of colour we can choose from; brushed champagne, stainless, copper and bronze.
- There are two types of grains we can choose from long or short grain.
- Once the project is complete we will feel really good :)

My husband really enjoyed the whole process and he says he liked how he felt when every tile was placed :) which is good news for me as I can think of other projects to do. My children and family/friends who came said how good it looks. My four year old suggests that we decorate the entire living room with these tiles :)
These tiles are available online and at home hardware stores such as Home Depot. Aspect metal tiles will look good as backsplash, in small areas of the wall to add accent, in cabinets and to put detail around fireplace etc. We really enjoyed the process of doing this project and are enjoying how good the kitchen looks now. If you are thinking of doing something to spice up your kitchen or other areas around the home think metal and choose these tiles from Aspect ideas.

All rights reserved on photographs and written content Createwithmom © 2012. Please Ask First
Updated September 3, 2015 In Reply to a question from a reader (Thank you Stacey):
Was curious how they have held up. More info about the additional glue you used would also be interesting. Did you take the foam backer off first?
Answer
The Aspect tiles are holding up great since we placed them in 2012. We did a kitchen renovation (Cabinet transformation) and decided to keep the aspect tiles because it still looks new. We did not remove the foam backing as it is not supposed to be removed just the peel from the sticker was removed before each tile was pasted. There is a film protecting the tiles which was removed after the tiles were installed. The glue that was on the peel off wasn't as strong (the items in 2012), so I used the "Weldbond" universal adhesive that can be found at Homedepot or Lowes, you could use any construction adhesive. I primed the wall before installation so the tiles stuck firm.
Also another tip, if you need to cut the tile its best to use a utility knife and keep scoring it and then snap off.
August 6, 2012
The Natural Soap Chef

From the time I had got this book, I have been trying to get the main ingredient Lye, also known as sodium hydroxide. I looked for it at Michaels, which doesn't carry it. Every time I went to the hardware store I forgot about buying Lye, so I went ahead and read the whole book to prepare myself before making soap.

The author of the book has done lots of research and made a variety of soap before she wrote this detailed book.
There are different ways to make soap, such as buying a pre-made soap base, shredding it and then adding our own colour, fragrance and exfoliant before remaking it. The book doesn't cover this method as the author uses the cold-processed approach to make soap.
The recipes to make soap are given in small batches to prevent waste and for us to use extreme caution when making soap.
Her instructions are detailed, which will definitely be helpful in the process of making soap at home. If you are interested in this craft, I recommend that you read the whole book before making the soap from scratch.
The book is written in a personal friendly manner. The recipes in the book are separated into beginners, coffee tea & stout, goat's milk coconut milk & puree and recipes to impress. Some recipes for the soap include rosemary olive oil soap, almond cookie soap etc... The presentation and packaging chapter has neat ways to package homemade soaps. The pictures in the book make it very inviting for us to try our hands at making soap.

As much as soap making sounds exiting and fun, the main ingredient Lye is a dangerous hazardous substance to work with. This chemical can cause burns, scarring and blindness. It is also fatal if swallowed, so it must be used with extreme caution. After reading the hazard part I have made up my mind to pass on making my own soap, despite the creative aspect involved in making soap at home. It would be very hard for me to use gloves, goggles and work in a safe area as I tend to always put things in my hands and my children will want to participate (because it sounds fun). To have this type of ingredient at home will cause a lot of stress :)
Reading this book has made me become more aware of the ingredients that go into soaps and a whole new respect to soap makers :)
If you would like to take a look at this book it is available at bookstores, online and amazon. If you have any questions ask the author here.
All rights reserved opinion of the written content Createwithmom © 2012. Please Ask First
July 23, 2012
Sharpie brush tip marker

With this new brush tip Sharpie markers we can create fine or bold lines and use it for shading.
Children and Adults will enjoy using these permanent markers in a variety of surfaces such as posters, notebooks, helmets, skateboards, bicycles and signs etc. to express their artistic flare.

My children and I enjoyed designing these tea light candles. It was easy to use, so we had lots of fun creating these unique designs within a few minutes.

We painted this ceramic pot easily without leaving a mess to clean :) so I am looking forward to do more projects with these markers.

To paint this pot, we need
Sharpie brush tip markers*
clay or ceramic pot
and your imagination :)
Use the markers to paint on the pot, the tip changes to the pressure we put in our hands. Although it dries really fast, try not to touch the painted surface right away as you paint to avoid smudges.
*The markers are available at Staples, Walmart, Real Canadian superstore, DeSerres in packages of 4 and 8.

Giveaway:
If you would like to win these Sharpie products and express yourself please leave a comment on this post before August 5th. Open to Canadian readers.
Follow me on twitter and Facebook so I can contact you if you are the winner.
Update: The winner is did you know canada.

All rights reserved on photographs and written content Createwithmom © 2012. Please Ask First
June 18, 2012
Painting and projects

Mag Ruffman and Lowe's have created videos of cool fun family constructible projects that teach parents and children how to build things that they could use. This is a lovely way to create lasting memories. Some project ideas from Lowe's Family Fun Projects are building a step stool, table with a writing space, a hockey/soccer net and more.
November 28, 2011
Cake boards

It is easy to make these cake boards which can be reused or tossed away after using.
All you need...
heavy cardboard from boxes
aluminum foil
I cut heavy cardboard from boxes and covered it with aluminum foil. It can be cut into any desired shape.
A cake I made using an homemade cake board.
September 10, 2011
Flower chains to celebrate with

straws cut into 2"
twine thread
shapes of flowers in different colours cut from printer paper
thick embroidery needle
Use the needle and thread the twine. This needle is safer because it is not sharp. Thread the straw and flowers to any length that will be easier to put and remove ones it is tied around the neck.

All rights reserved on photographs and written content Createwithmom © 2011. Please Ask First
August 14, 2011
Recycled bottles to keep crayon

A perfect way to recycle and reuse containers that are very useful around the house. We made a place to keep crayons. This activity can be done with any other type of container or tin.
2 litre pop bottle
bias tape or cloth
glue
white out or chalk ink
scissors
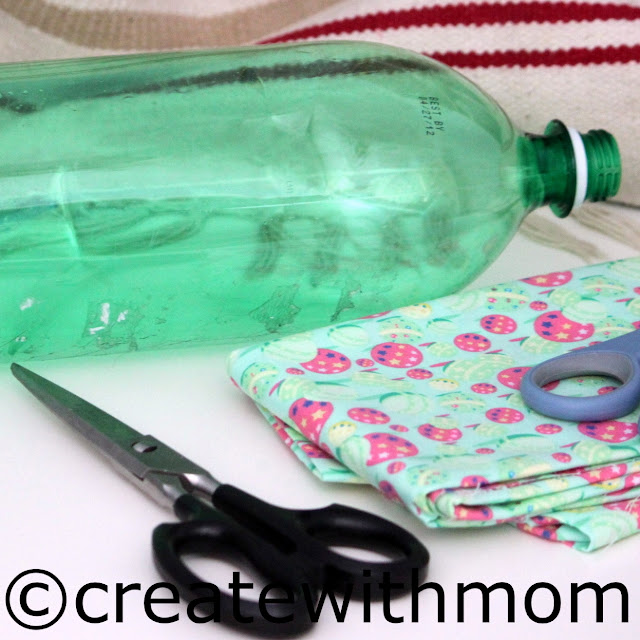
Poke a hole then using a sharp scissor with a help of an adult cut the bottle, cut at any point depending on how deep you want the final product to be. Don't use the scissors that are used for cutting cloth.

Measure the diameter of the bottle then cut a piece of cloth with 1 1/2" width and use as bias tape or use a store bias tape. Cut the bias tape at least 1/2" more so it would over lap.

Use glue and paste the bias tape around the bottle. This is decorative and also prevents cuts when putting the hand into the bottle. Can use liquid paper or chalk ink pens to decorate the outside of the container.

July 30, 2011
Cushion covers

These cushion covers will take less than 10 minutes to make.

outdoor or drapery material
scissors
thread
ruler or measuring tape
buttons optional
Measure the size of the cushion then fold the cloth according to the diagram below and cut the cloth.


I didn't put the exact measurements because the same method can be used for any size cushion or pillow.
Measure the cushion then fold the cloth and cut the three sides, when cutting make sure that one of the side is at least 3" longer so this piece can be tucked in and optionally buttons can be stitched. The above diagram will help when cutting and stitching.

For this project I used outdoor material from a fabric store and the cushion inside was pre made. The same method can also be used to make cushions and put filling in it, if you want to put filling there is no need to keep that extra length on one of the sides. Instead stitch all the sides.
Happy sewing :)

All rights reserved on photographs and written content Createwithmom © 2011. Please Ask First
Subscribe to:
Posts (Atom)